This is a part two of a series of posts about consuming Azure Functions secured by Azure Active Directory.
- Part 1 - Creating an Azure Function with the Azure CLI 2.0
- Part 2 - Securing an Azure Function with Azure Active Directory
- Part 3 - Creating an Angular Client Application
- Part 4 - Adding Azure Active Directory Group Claims Checks
The goal: create an Azure Function, secure it with Azure Active Directory, and use Angular to pull data back from the AAD secured function. In Part 1 we created an Azure Function App and a basic function. Our Azure Function is accessible from Postman or curl, but not from a simple web page.
Configure Cross Origin Resource Sharing (CORS)
In order for us to call our simple API from a browser we must enable Cross Origin Resource Sharing or CORS. CORS defines how a server and browser can communicate when they exist in different origins.
origin: a combination of URI, hostname and port. e.g. http://someapi.somewhere.com:8080
By default, the Same Origin Policy prevents script that might be dangerous from one origin to make calls to other origins. CORS loosens some of the restrictions of the Same Origin Policy through the use of specific HTTP headers. These headers allow servers to explicitly allow origins, or even wild cards, that are allowed to request resources from a specific site. Browsers must also implement a part of the contract to enable communication with a resource which comes from a different origin.
To enable CORS in our Azure Function, we simply need to flip a switch, and indicate the allowed origins. In our case, configuring localhost with a specific port for our application will be fine.
- Click your Function App name in the Azure Portal.
- Click the Platform features tab
- Click CORS under the API section
- Add an entry for http://localhost:5000 (for example)
- Click Save
That's it! A click, a url, and... DONE! For those of you who have had to do this in the past in ASP.NET or any other framework, this used to be painful. Now, you kids get off my lawn! :-)
Now let's try that code again from Part 1 and see what happens. I copied the html page from Part 1 to a folder, and named the file index.html. Since we are using an origin of http://localhost:5000, I fired up an http server from a terminal in the same directory as my index.html file using python -m SimpleHTTPServer 5000 and called the API from our simple web page.
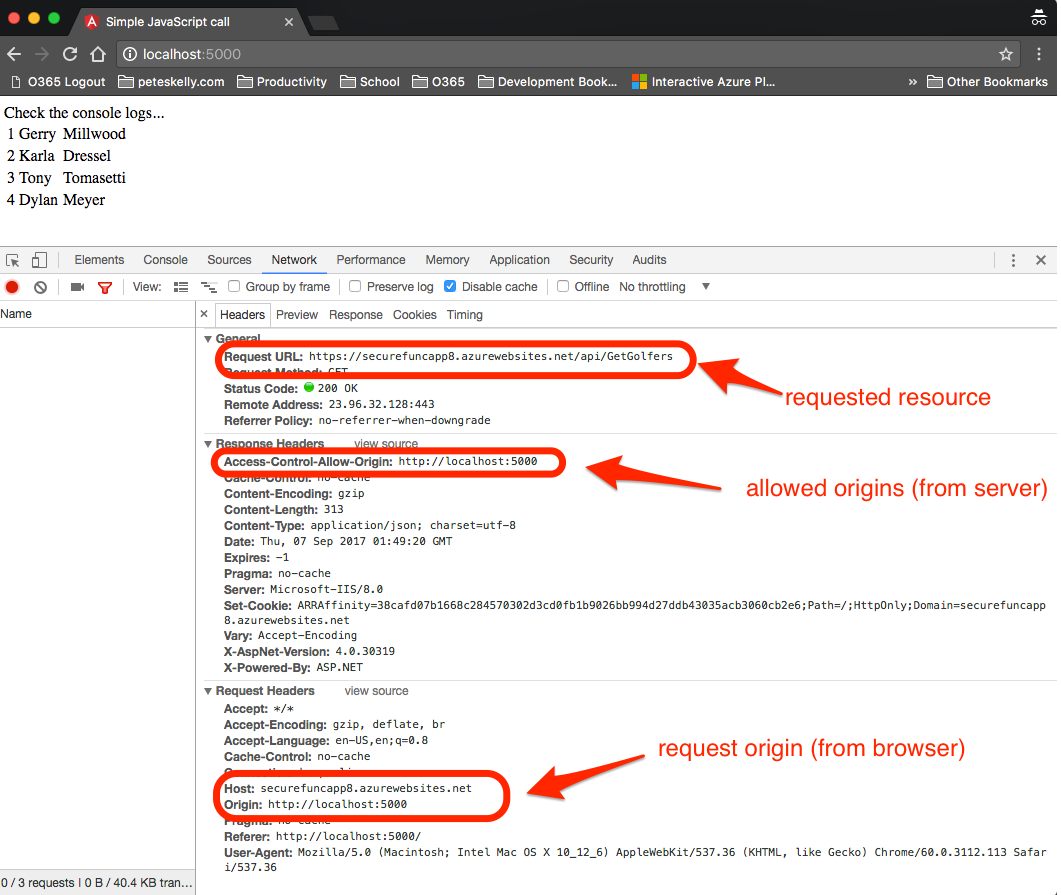
As you can see, the browser indicates the host resource and the origin of the request, the server returns the Access-Control-Allow-Origin header, and the browser continues with the request. In our previous attempt in Part 1 we recevied an error that there was "No Access-Control-Allow-Origin header is present on the requested resource." and the browser terminated the request.
A complete discussion of CORS cannot be covered here. The best explanation of CORS I have found is the HTTP Access Control CORS topic on the Mozilla developer site. An understanding CORS is a must if you are working with web technologies today - Web API's, serverless, micro-services, or whatever you want to call them.
Configure Authentication and Authorization
We now have an anonymous function, callable from a simple web page, which is not hosted in the same domain, or origin, as our function thanks to CORS. Now, let's secure the function using Azure Active Directory.
- Open the Azure Portal again and navigate to your Function App
- Click on the Function App name in the Function app page
- Then click on the Platform features link at the top of the page
- Then click on the Authentication / Authorization link in the Networking section
- Under AppService Authentication click the On button
- Be sure to select Log in with Azure Active Directory in the Action to take when request is not authenticated drop down list.
- Click the Azure Active Directory entry in the Authentication Providers list
- Click Express and Create a new AD app (this can only be done once! Leave me a comment if you hit a snag here.)
- Change the name of the app in the Create App text box to securefuncapp8api (if you want to follow along with the example)
- Click OK
- Click Save to return to the Platform features blade
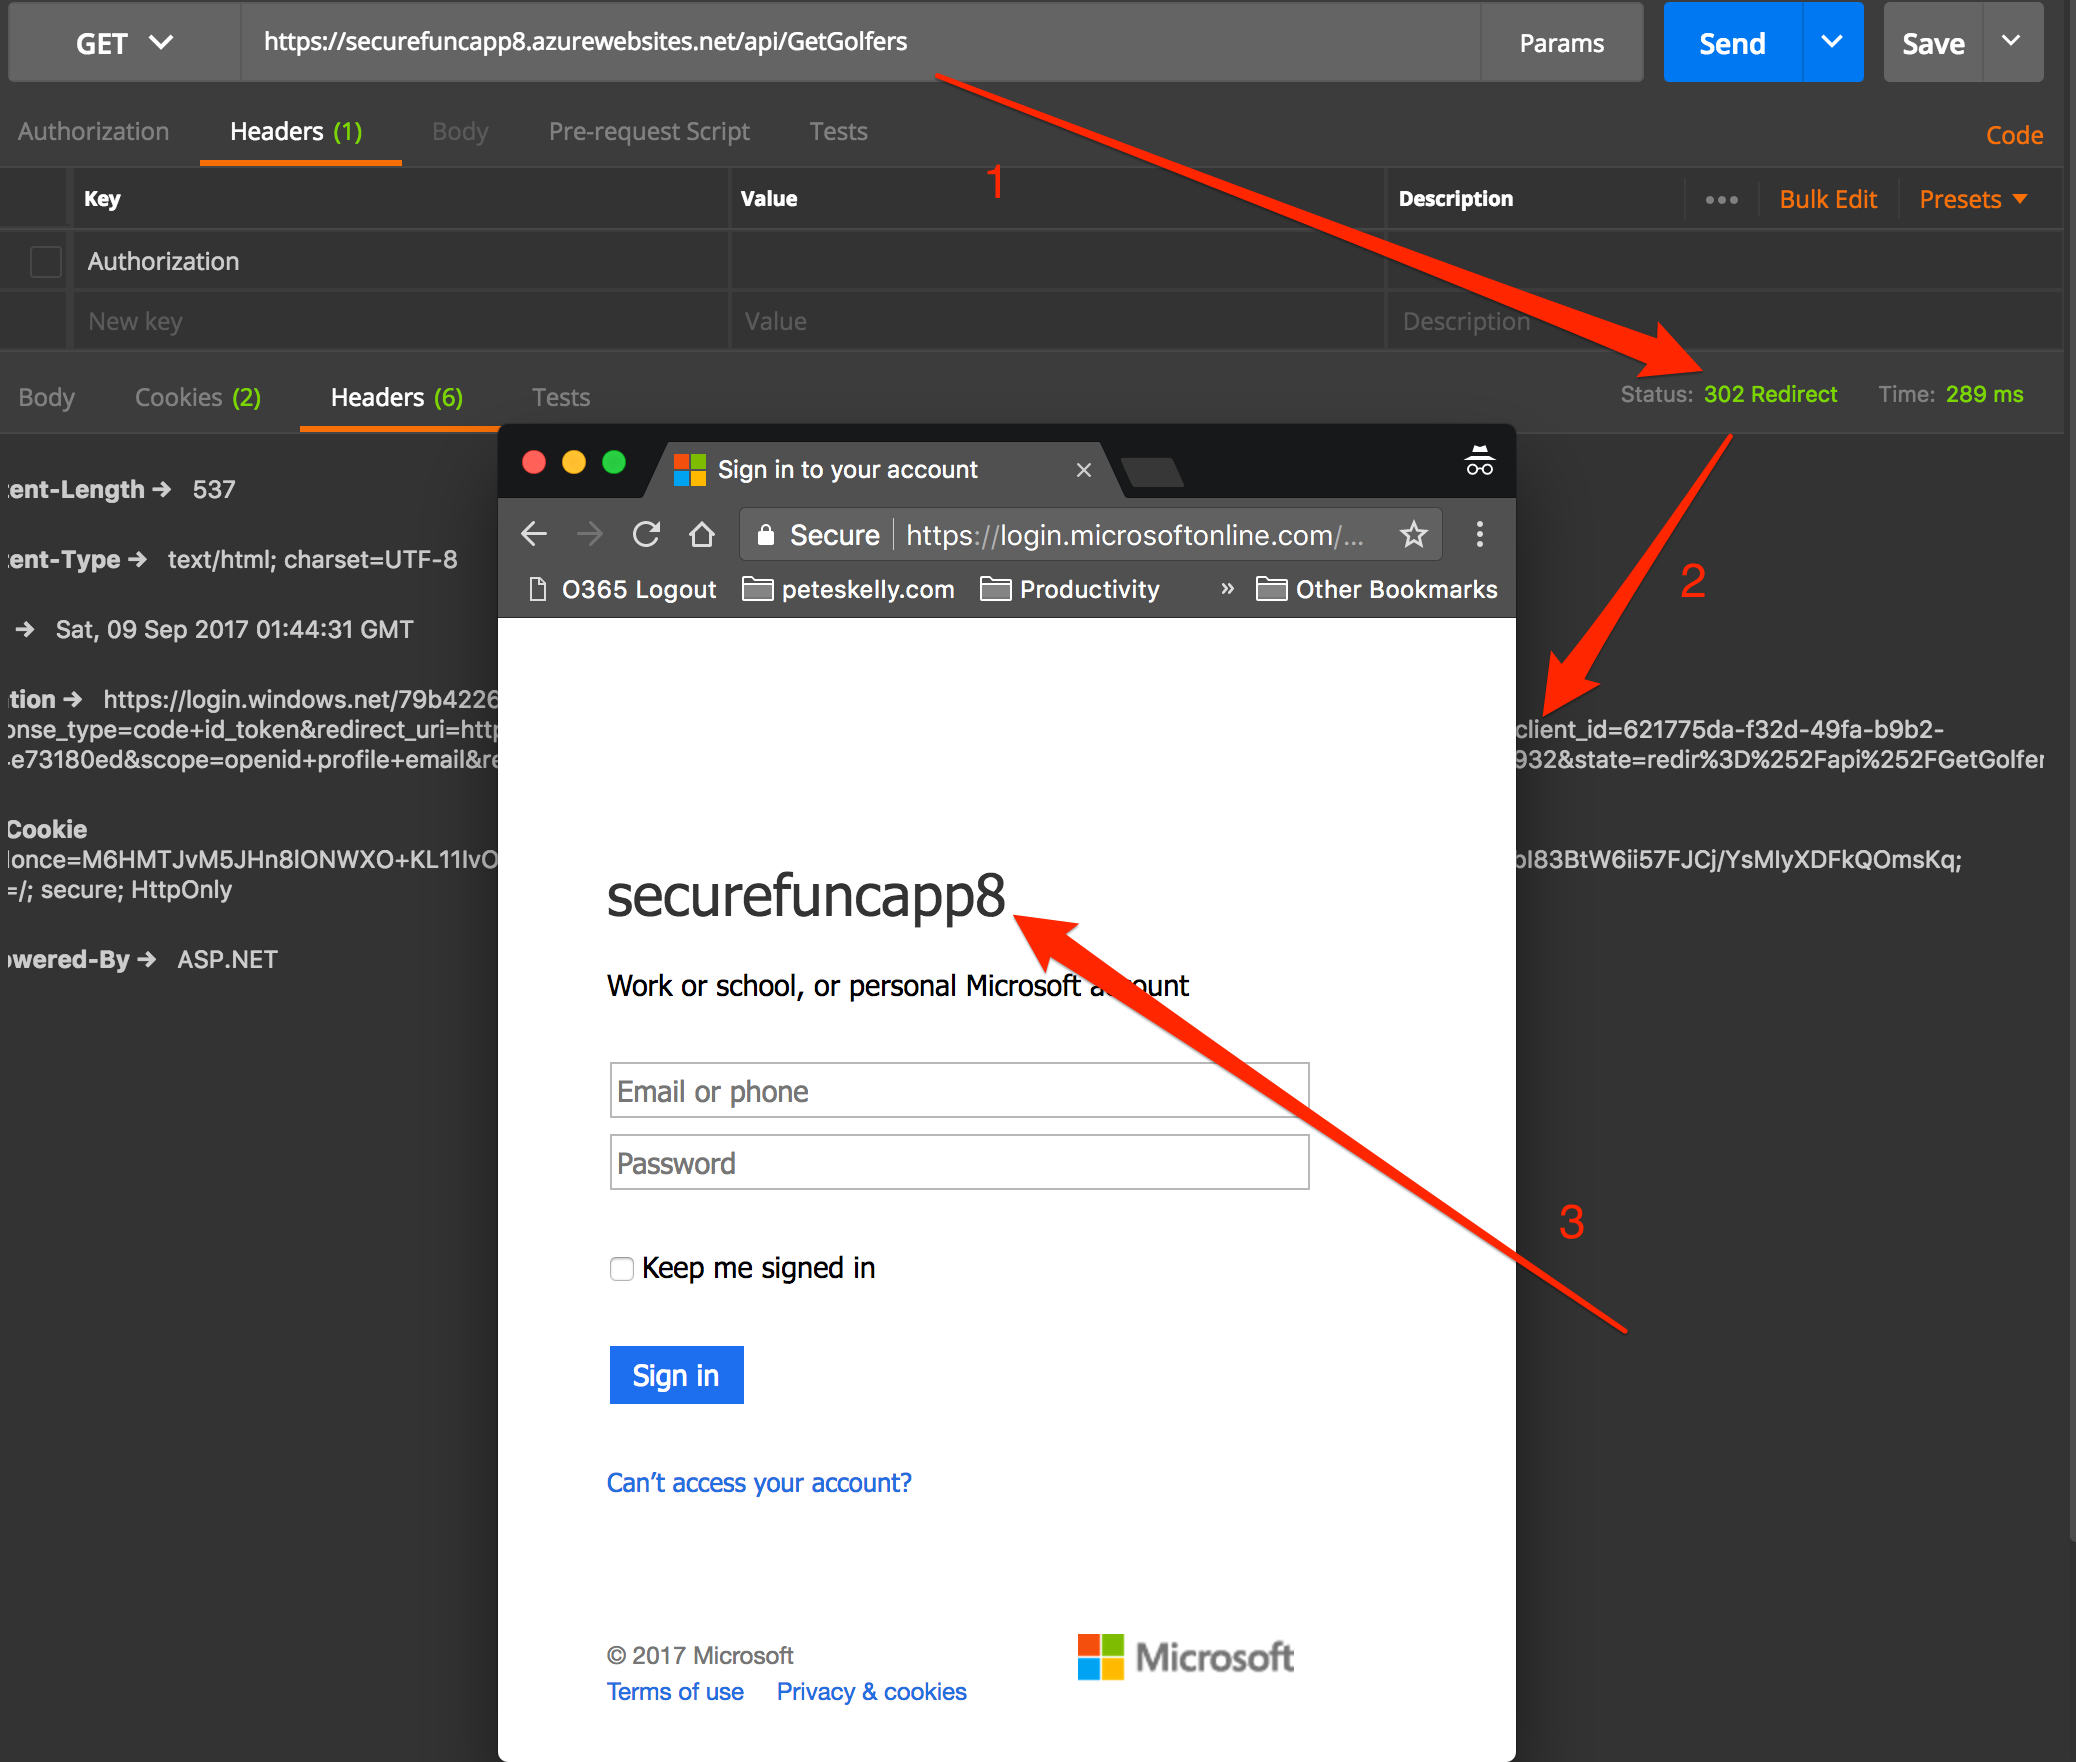
Your application is now secured by Azure AD Authentication! To prove this, let's use Postman again. Try pasting in the function URL again and click Send. Hmmm... what happened, here? No results, but you should get a 302 Redirect in Postman.
Updated 03Mar2018 - this section updated based on some feedback in comments below. Thanks to @ed_cline and sb for comments below to help clarify this section.
As indicated above, Postman should return a 302 redirect (see comments below for some details arounds possible issues). In the image above the following describes the numbered arrows.
- We are still trying to access the same Function url
- We now should get a 302 redirect to the authorization end point for Azure AD
- Copy the redirect url and paste this into a browser (Chrome if possible to follow later steps).
Once you have copied the 302 response header url and pasted it into a browser, you should be presented with a login dialog. Let's review the components of the redirect url.
1. https://login.windows.net/<tenant_id>/oauth2/authorize
This is the Authorization endpoint for the tenant in which our Function App resides. I removed my tenant identifier for obvious reasons. Hopefully I remember to remove it from images and other samples too!
2. ?response_type=code+id_token
The outputs we expect as part of our authentication. In this case we expect an access code and an id_token. The id_token will let us get simple claims like a name or email. This will help us display a user name for example, among other things.
3. &redirect_uri=https%3A%2F%2Fsecurefuncapp8.azurewebsites.net%2F.auth%2Flogin%2Faad%2Fcallback
This is the redirect that will handle the authorization. Note that in this case, this url is an endpoint on our Function App that Azure manages for us!
4. &client_id=621775da-f32d-49fa-b9b2-6e24e73180ed
The client_id of the Azure AD App that we created when we configured the Azure AD integration. This enables finding the unique app id in the tenant. We'll cover a little more of this client_id and how to manage this information in future parts.
5. &scope=openid+profile+email
The scopes for the request (resources, permissions/actions) that the app is requesting. In our case, this is a simple set of authentication scopes.
6. &response_mode=form_post
This indicates that we want the results, in our case the code and id_token, returned in a form post to the redirect uri - which again we do not have to manage since this is part of our App Service!
7. &nonce=dbaee60794b948c58f27c068611528e1_20170909014932
Nonce is a "hard to guess token" to reduce token replay attacks" - see Chapter 6 - Modern Authentication with Azure Active Directory for Web Applications (Vittorio Bertocci) for complete details.
8. &state=redir%3D%252Fapi%252FGetGolfers
State is the information the request stores for later use after authentication, in our case the function api url from which we want to return data.
If you copy the redirect url to a browser and navigate to that url, you will be prompted to log in as shown in the image above. Then you will be prompted to grant consent for the scopes the app has requested.
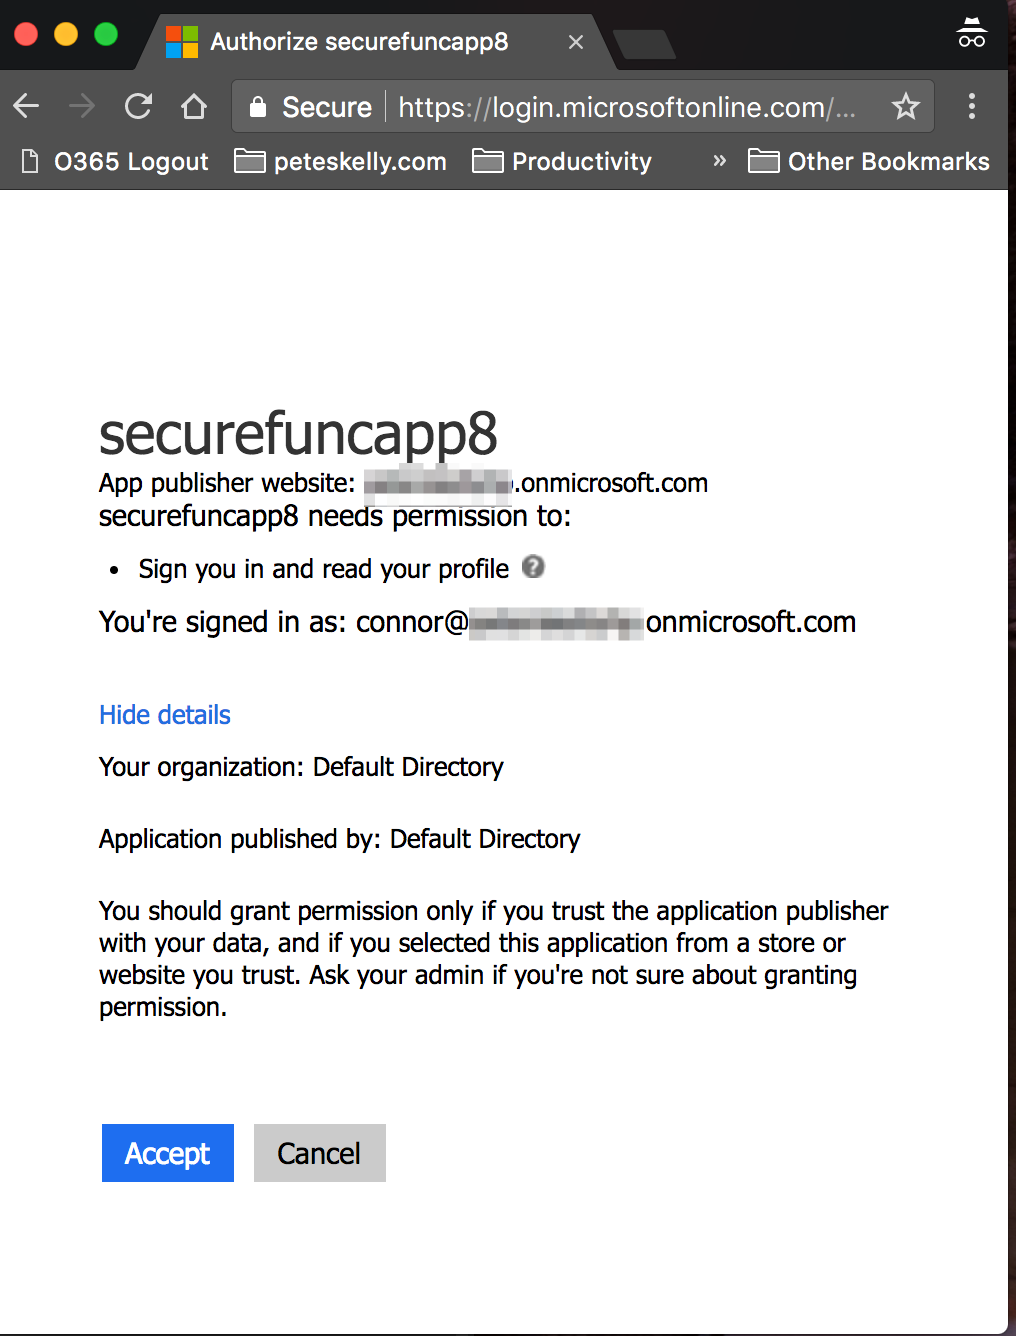
Once you have logged in and consented, you will be redirected to the /api/GetGolfers method and returned the data, as well as a cookie for use in subsequent calls.
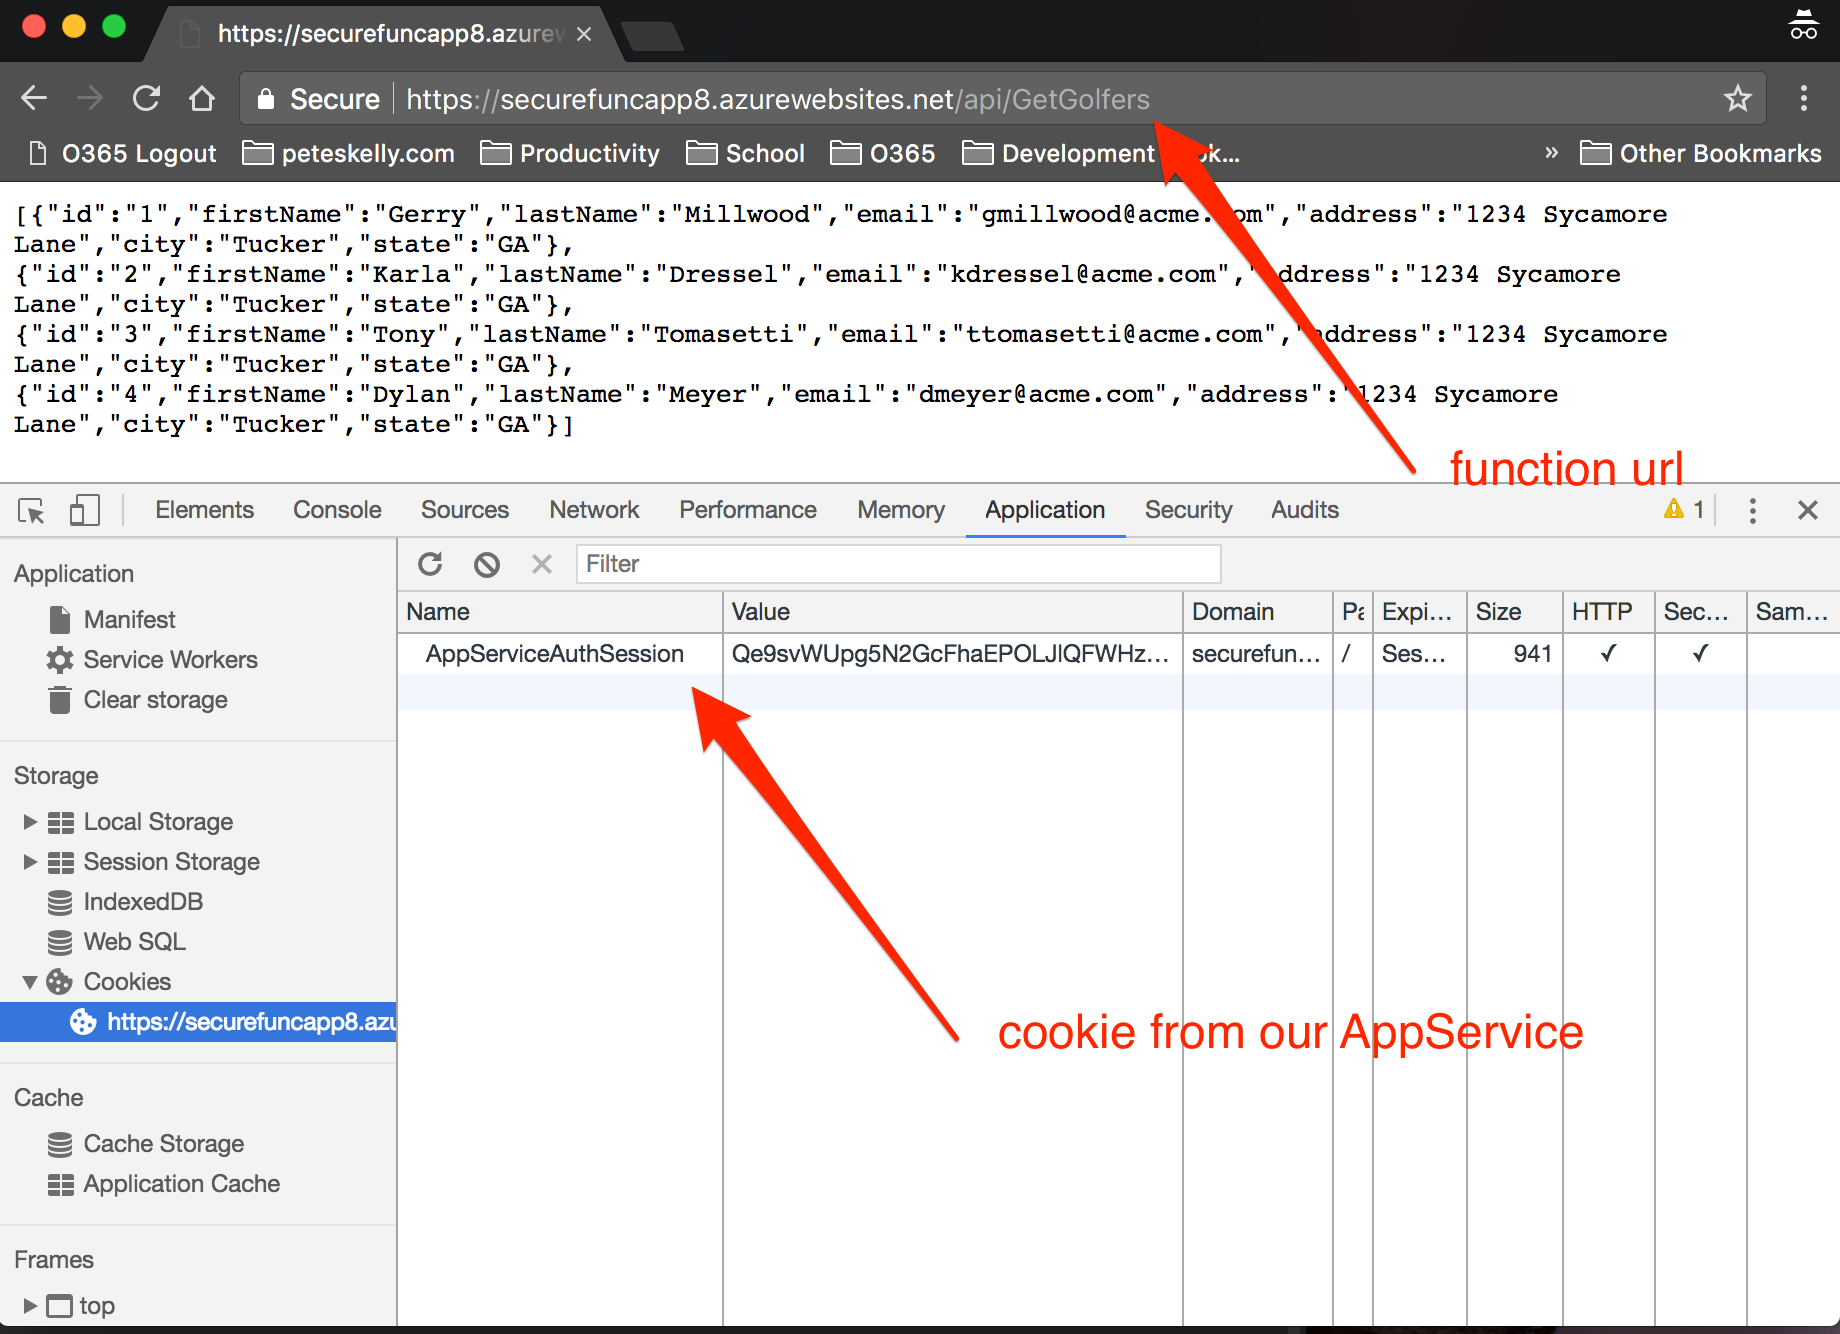
Great, we can make a call to a function, authenticate, and get data back. Before we jump to the UI that actually ties this all together, let's check out what we have available in the function from the authenticated user.
View Claims in the Function Request
Let's find out a little bit about the calling user from inside our function. We'll add some more code to out function, but first we need to enable the use of some other .NET libraries.
- Open the Azure Portal again
- Navigate to your Function App
- Click on the Platform features
- Then click on the AppService Editor
- In the left hand navigation window, expand the function name
- Right click and Add a new file named project.json
- Add the following to the project.json file
  {
    "frameworks": {
        "net46":{
            "dependencies": {
                "Microsoft.IdentityModel.Clients.ActiveDirectory": "3.13.8"
            }
        }
    }
  }
- Close the App Service Editor
Return to your Function App and open the function.
- Add the following to the using section of the function run.csx file (you can also do this in the AppService Editor if you would like).
using System.Configuration;
using System.Security.Claims;
using System.Net.Http.Headers;
using Microsoft.IdentityModel.Clients.ActiveDirectory;
- Add the following to the top of the functions Run method (just before our new list of Golfers declaration)
    foreach (Claim claim in ClaimsPrincipal.Current.Claims)
    {
        log.Verbose("Claim:  "+ claim.Type + "  Value: " + claim.Value);
    }
- Click Save
This will allow us to see the claims of the Current ClaimsPrincipal executing our function.
Viewing User Claims in the App Service Streaming Logs
You can view the claims of the authenticated caller through the logs in the Logs pane of the Function definitions, but lets try something different.
Open a terminal or a command prompt and type the following Azure CLI command. Remember, you will need the Azure CLI 2.0 installed from the Part 1.
az webapp log tail --name securefuncapp8 --resource-group securefuncRG8 --verbose
You may be prompted to use az login to authenticate, but once you do you'll be presented with the a streaming logs session. Hit refresh on the browser window that we used to authenticate and call our function. Watch the terminal session.
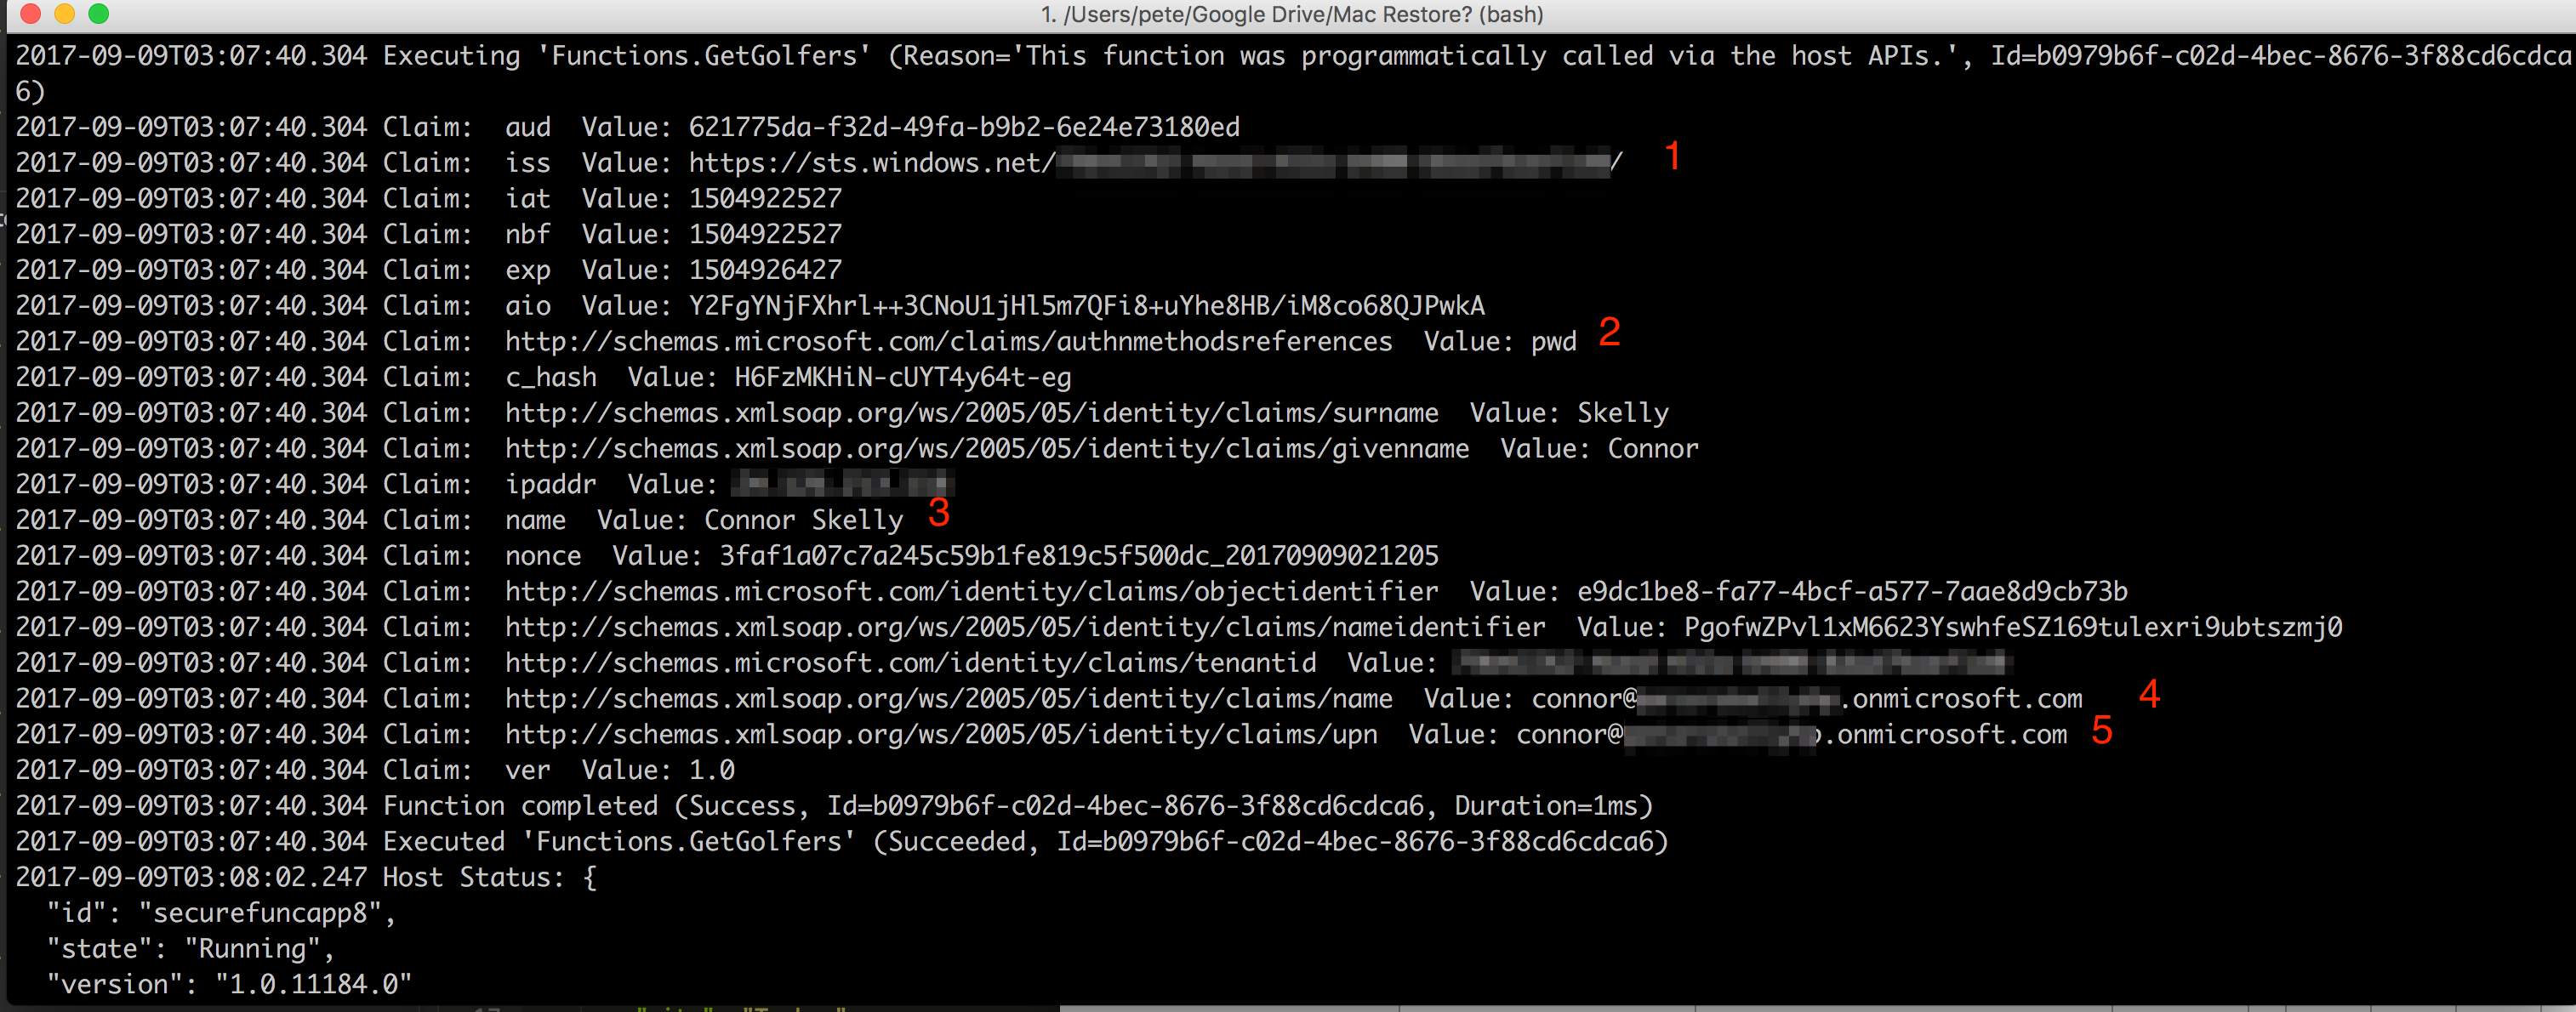
Some claims of note:
- The first iss claim is the issuer for the claims.
- The authmethodsreferences used to authenticate, which was a password
- The name of the principal currently authenticated
- The name claim of the authenticated principal
- The upn claim of the authenticated principal
Up Next
Great, now we have an Azure Function, secured by Azure Active Directory. We're getting close! Coming up, Part 3 - Creating an Angular Client Application, we'll leverage an Angular project to provide a user an interface to login and consume our function API.
As always, leave me a comment below - HTH.