UPDATED: Updated May 5,2020 - See the samples in the Office 365 CLI documentation Sample Scripts area.
UPDATED: As of April 22, 2020, the bash script and merge file (for jq) described in this post have been updated to us v2.8 of the Office 365 CLI. In addition, a PowerShell version is now available as a gist.
I have been a fan of the Office 365 CLI since it's original release. The Office 365 CLI is great! You can quickly use single commands like o365 spo site list or o365 graph o365group list and get a list of SharePoint sites or Office 365 groups. There are currently over 200 commands in the CLI now (as of v1.11.0-beta), and over 150 are SharePoint commands! The CLI is incredibly easy to use, discoverable from the command-line, and if you still read documentation, the docs are awesome! Recently, Waldek Mastykarz (Office 365 CLI maintainer) asked if anyone had created scripts using the Office 365 CLI or if people were simply using it for one off commands.
Have you ever built a script using the #Office365CLI or rather using it for one-off commands?
— Waldek Mastykarz (@waldekm) December 9, 2018
JSON Output Mode
The Office 365 CLI is really powerful, but simple one off commands are only the tip of the iceberg. I started with one off commands, but quickly discovered the CLI output modes. In addition to returning text to the console, all Office 365 CLI commands can output JSON via the --output json switch. The --output json switch not only outputs JSON, but extends the information contained in the results.
Great, you have a JSON document now, but how do you consume, parse, and put the data to use? This is where jq comes to the party - this is where the magic happens!
jq is like sed for JSON data - you can use it to slice and filter and map and transform structured data with ease - jq docs
Using jq to read, parse, combine and rearrange content in your scripts enables you to manage Office 365 Groups, Teams, Flows, and even deploy and configure SharePoint assets (sites, pages, terms, content types, etc.). Even granting Azure AD OAuth2 grant permissions are possible. Whether you parse a return result for a simple value as a parameter to another command or parse large json results, using the Office 365 CLI with jq provides real power and flexibility! Let's look at a relatively simple example.
An Example - Create a Flows Report with Creator Details
As an example of the power of the Office 365 CLI + jq, let's build a report of the Flows in our tenant. The Office 365 CLI can output all of the Flow details to JSON, but each Flow's creator is only returned as the guid of the Azure AD user object (snippet below).
...
"creator": {
            "tenantId": "a5ba5436-bc57-4ea5-b2a6-17e9725ef234",
            "objectId": "2230f6e1-e0c8-3e20-9123-60c9bc7d3123",
            "userId": "2230f6e1-e0c8-3e20-9123-60c9bc7d3123",
            "userType": "ActiveDirectory"
        },
...
Our goal is to generate a CSV report of Flow title, state, owner name and owner email. Let's walk through the script to do this. The complete script and the module used in this example are gist's which can be found here: generate-flowreport.sh and merge.jq.
Before we get started, make sure you are logged in to the azmgmt and graph by running the following 2 commands.
o365 azmgmt login

o365 graph login
This will let you run the script. If you are impatient, you'll need the Office 365 CLI and jq installed, and you can download the gist's, place them in the same directory and run the following:
sh generate-flowreport.shStep 1 - Get the Default Flow Environment
The first step is to call o365 azmgmt to get the Flow environment from which to list our flows. The following calls azmgmt to query for the environments, uses the --output json mode to pipe the JSON a temp file. The call to the jq on the next line pipes each Flow object to jq, uses the jq select filter to get the default environment, and finally filters to the .name property and stores this in the $FLOW_ENVIRONMENT variable.
o365 azmgmt flow environment list --output json > $TMP_ENVIRONMENTS

FLOW_ENVIRONMENT=$(cat $TMP_ENVIRONMENTS | jq -r '.[] | select(.name | contains("'"Default"'")) | .name')
Step 2 - Output all Flows to a JSON file
Now that we have the $FLOW_ENVIRONMENT variable, we can then call azmgmt to list the flows in that envrionment. We use the --asAdmin switch to get all of the flows, not just the current users. The output here is stored in a flows.json file which is the $TMP_FLOWS variable.
o365 azmgmt flow list --environment $FLOW_ENVIRONMENT --asAdmin --output json > $TMP_FLOWSStep 3 - Map Flow Creator ID's to User Information
We have our Flows, great. Now we need to build our mapping of unique owner information to each Flow's creator.userId property. We start by filtering the $TMP_FLOWS (flows.json) file using map to create a new array of only userId values. Then we filter to unique values, and finally filter the resulting array by selecting only the userId value of each entry.
uniqueOwners=$(cat $TMP_FLOWS | jq -r 'map({userId: .properties.creator.userId}) | unique | .[] | .userId') To enable concatenating our outputs properly, we need a count of the unique userId values. The userId's will be used to call the Microsoft Graph and get the owner information and the counter will enable concatenating user information into a single file.
ownerCount=$(cat $TMP_FLOWS | jq -r 'map({userId: .properties.creator.userId}) | unique | length') Now we can loop over the $uniqueOwners and build out our $TMP_OWNERS (owners.json) file. I'll skip the loop and simply show the important bit of calling the graph (see the full gist for details).
echo $(o365 graph user get --id $ownerId --output json) >> $TMP_OWNERS Step 4 - Map Creator information into each Flow
We're in the home stretch. We have our data, and we need to merge the content. To do this, and not pull the rest of my hair out, I used a jq module. A module is simply a file with jq instructions in a *.jq file. The module is called from jq using the following:
jq -n --argfile flows $TMP_FLOWS --argfile owners $TMP_OWNERS -f merge.jq >> $TMP_MAPPEDFLOWSThis line calls jq with 2 files as arguments (somewhat obvious), our flows.json and owners.json temp files. The final argument is a jq module file. This was the part where StackOverlflows jq topic and I became very good friends! Simple jq filters can be grokked pretty quickly, but complex filter syntax can be challenging, or maybe it is just me!
# Create a dictionary based on the $owner.id property
($owners | map(select(.id != null)) | map( {(.id): {displayName, mail}}) | add) as $dict
# # output each flow, appending owner details from hash map value
 | $flows |.[].properties.creator |= . + $dict[.userId]
Let's unpack this one a bit. Here's a breackdown of this module:
($owners- start with the $owners json array file parameter| map(select(.id != null))- use map to select only valid owner entries (I had a null in one of my tenants) resulting in a new array| map( {(.id): {displayName, mail}})- map the filtered array to a new object with the id property as the key, and the .displayName and mail as the value| add) as $dict- use the add filter to merge the array elements into a single hash object. The $dict variable is now "stored" and available for later use| $flows- begin filtering the flows.json array values|.[].properties.creator |= . + $dict[.userId]- filter each flow, selecting the creator element and use the|=(update operator) to append the hash map value of the owner to the current creator json object
And there you have it. Querying Flows from Azure, querying users from Azure AD, combining the result and exporting a simple report. As a small bonus the script will ask if you want to open the CSV in Excel if you are on macOS.
Conclusion
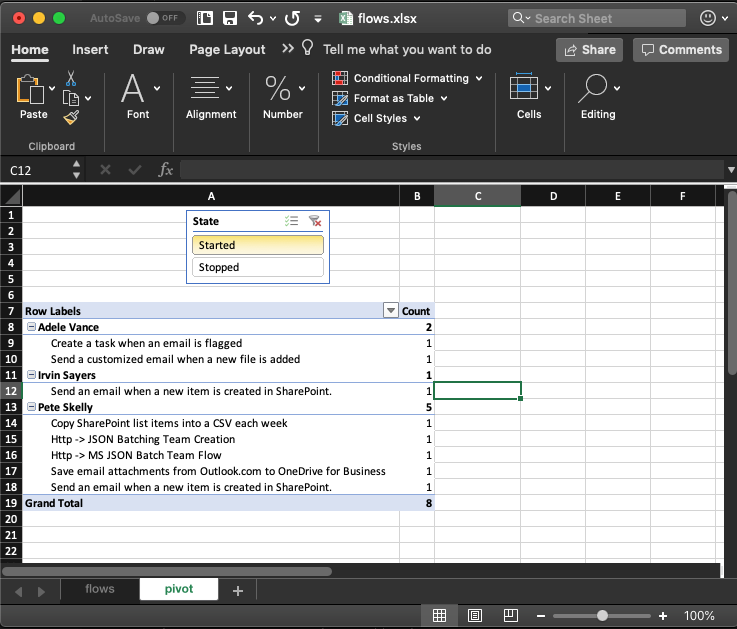
We now have our CSV file, and we can open that file to build our final report. For example, we may want to view all Flows, and then filter by State of Started (or enabled). A great enhancement to this report would be adding Flow runs, but I will leave that as an exercise for you.
With all of the Office 365 CLI commands at your finger tips, the possibilities for provisioning scripts, simple reports, build integration, and much more is possible. The CLI is open source, by the community and for the community, give the Office 365 CLI contributors a shoutout on Twitter as well and let them know how useful this tool is!
You definitely will want to add the Office 365 CLI and jq to your toolbox.
HTH - leave a comment below if this was useful or have an issue.
Tip: Use jq at the command line for testing filters to see the results. "Debugging" with jq was a bit challenging to me. e.g. jq -n --argfile flows flows.json --argfile owners owners.json -f merge.jq will enable you to test the outputs of steps along the way. If anyone has any tips or tricks for this, please post a comment!