The code for this post is part of the Azure Functions for SharePoint Github project.
Background
About a month ago, Doug Ware introduced the Azure Functions for SharePoint (AFSP) open source project. The project's goal is to provide a set of common plumbing functions for scenarios shared by most SharePoint provider hosted add-ins implemented as Azure Functions. As past posts of mine have indicated, I see Azure Functions as a compelling service from Azure. In addition, I think the Azure Functions pattern Doug is promoting is an equally compelling use of Functions in the Office and SharePoint space and I wanted to get involved with the project.
One of the goals of the project is to enable people to make the use of the pattern and Azure Functions quickly and easily. While Doug provides a Client Configuration Guide to manually configure the Azure resources required to start using the Azure Functions for SharePoint, we thought minimizing the friction of getting started by providing a scripted configuration of the Azure Resources required would be very helpful.
The Beginning - Azure Resource Manager (ARM) Templates
If you have been using Azure for a while, you may recall that early on there was no way to group related resources together. Knowing what storage account was associated with virtual machines or a web site or other deployed assets was not easy. The classic deployment model you created and tracked each resource independently. The entire deployment model was simplified with the concept of an Azure Resource Group.
With the introduction of the Azure Resource Manager deployment mode, resources could now be managed as a group. For a complete description of the benefits of the resource manager model, see the docs and a history of the deployment models. It's worth a read!
One of the biggest benefits of the model is the definition of your resources, dependencies, and overall deployment of related resources can be defined in an Azure Resource Manager (ARM) Template. A simple JavaScript Object Notation (JSON) file used to define the infrastructure, dependencies, configuration properties, tags, access control and policies for your resource group.
This post will describe the ARM template used to simplify deployment of the Azure resources required to get you started with Azure Functions for SharePoint. I highly recommend checking out the Azure Quickstart Templates for a huge selection of sample templates as well.
Creating the ARM Template for our Resources
When I began this exercise, I only had a simple understanding of the ARM templates. I searched for some samples and blogs and found a trusted friend's blog post - Kirk Evans' - Creating ARM Templates with Azure Resource Explorer. Kirk's advice was to spend some time with the documentation, then dive in and try some things. The first document I read was Authoring Azure Resource Manager templates which does a great job of laying out the basics.
We wanted to make our ARM Template configurable, and I quickly found myself reading through the Azure Resource Manager template functions. I am by no means an expert yet, but this got me up and running quickly.
The simplest way to get started with ARM templates is to understand the four basic elements of the json file.
{
   "$schema": "http://schema.management.azure.com/schemas/2015-01-01/deploymentTemplate.json#",
   "contentVersion": "",
   "parameters": {  },
   "variables": {  },
   "resources": [  ],
   "outputs": {  }
}
We want to provide parameters and specify variables that will deploy a consistently named, but unique, set of resources so our documentation is very straight forward. We'll get some outputs from our template that we will use to configure the a developer settings file script deployment of AFSP assets from Visual Studio.
Creating the Azure Functions for SharePoint ARM Template
If you watch the Azure Functions for SharePoint Manual Setup video Doug created, you'll see we need specific Azure resource and some configuration properties in order to deploy and run our Azure Functions for SharePoint. Here are the resource group assets we need.
- Resource Group (sort of a necessity)
- Service Bus
- Storage Account
- App Service
- Azure Function App (web site)
Let's get started.
ARM Template Parameters and Variables
We're going to build our arm-template.json file which will have all of our resource definitions, dependencies, and outputs for us to use to streamline the developer experience.
First, we want some parameters to help us deploy the resources consistently. The first parameter we define is for the actual Function App name.
"parameters": {
    "appName": {
      "type": "string",
      "metadata": {
        "description": "The name of the function app to create."
      }
    },
...
}
The rest of the parameters are similar to the appName. We can have descriptions, types, allowedValues (constraints), default values and more. I'll skip explaining every parameter but will mention that we have parameters for all the resources we will need and a couple others that are defaults. All of these are contained in the parameters section of the arm-template.json file.
Using variables is vital, since creating some of the Azure resources requires that the HTTP endpoints to assets are unique. Using a template function to combine a parameter with a portion of the resourceGroup's identifier ensures we can enforce consistency while ensuring uniqueness.
Next, we have the parameters we want to provide that are contained in the arm-parameters.json file. These parameters are simply specific values that provide names for AFSP resources in order to get people started quickly and consistently.
 "parameters": {
    "appName": {
      "value": "spfuncs-app-"
    },
    "storageAcctName": {
      "value": "spfuncsstorage"
    },
    "serviceBusNamespaceName": {
      "value": "spfuncs-scvbus-"
    },
    "serviceBusQueueName": {
      "value": "spfuncs-events-"
    }
  }
Create a Service Bus Namespace and Queue
The first resource we create is a Service Bus namespace and a queue. These are optional resources for the Event Dispatch function, think web-hooks, but we'll create this now for completeness.
 {
      "apiVersion": "[variables('sbVersion')]",
      "name": "[variables('serviceBusName')]",
      "type": "Microsoft.ServiceBus/namespaces",
      "location": "[resourceGroup().location]",
      "properties": {},
      "resources": [
        {
          "apiVersion": "[variables('sbVersion')]",
          "name": "[parameters('serviceBusQueueName')]",
          "type": "Queues",
          "dependsOn": [
            "[concat('Microsoft.ServiceBus/namespaces/', variables('serviceBusName'))]"
          ],
          "properties": {},
          "resources": []
        }
      ]
    },
Notice the resources node for the service bus defines the queue name we want to use and that the Queue resource depends on the creation of the Service Bus resource. The resource dependencies concept is key to understanding ARM templates overall.
Create a Storage Account
Next, we need a storage account to hold our files and serve as the FileShare for us to upload our Function App assets to.
 {
      "type": "Microsoft.Storage/storageAccounts",
      "name": "[variables('storageAccountName')]",
      "apiVersion": "2015-06-15",
      "location": "[resourceGroup().location]",
      "properties": {
        "accountType": "[parameters('storageAccountType')]"
      }
 }
Create an App Service Plan Resource
Next we create the App Service Plan that defines pricing tier for our Function App.
 {
      "type": "Microsoft.Web/serverfarms",
      "apiVersion": "2015-04-01",
      "name": "[variables('hostingPlanName')]",
      "location": "[resourceGroup().location]",
      "properties": {
        "name": "[variables('hostingPlanName')]",
        "computeMode": "Dynamic",
        "sku": "Dynamic"
      }
  }
Create the Function App Resource
Now that we have an App Service Plan to host the Function App, and which defines we are using a Consumption pricing plan, we can define the last resource in the resources node. This is the heart of our template.
The entire Function App resource template is a bit long, I'll use an image here and point out some specific points of interest that most of the resources use overall.
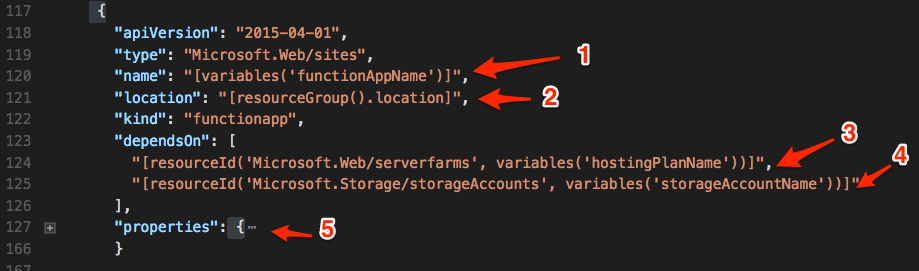
- The name of the resource is based on the
functionAppNamevariable we defined earlier which uses a function to concatenate the appName parameter and the group suffix variable. - The location of the resource is based on a function which uses the
[resourceGroup().location]property. - The Function App depends on a hosting plan from the App Service resource which uses a template function to get the specific resource ID of the AppService Plan as the dependency.
- The Function App also depends on a storage account resource which also uses a template function to get resource ID of the storage account dependency.
- And last we have the properties which include dynamically defined storage account references, the AzureWebJobsDashboard, AzureWebJobsStorage settings, as well as our custom ConfigurationStorageAccount and ConfigurationStorageAccountKey app settings that are specific to AFSP.
 "appSettings": [
            {
              "name": "AzureWebJobsDashboard",
              "value": "[concat('DefaultEndpointsProtocol=https;AccountName=', variables('storageAccountName'), ';AccountKey=', listKeys(variables('storageAccountid'),'2015-05-01-preview').key1)]"
            },
            {
              "name": "AzureWebJobsStorage",
              "value": "[concat('DefaultEndpointsProtocol=https;AccountName=', variables('storageAccountName'), ';AccountKey=', listKeys(variables('storageAccountid'),'2015-05-01-preview').key1)]"
            },
            {
              "name": "WEBSITE_CONTENTAZUREFILECONNECTIONSTRING",
              "value": "[concat('DefaultEndpointsProtocol=https;AccountName=', variables('storageAccountName'), ';AccountKey=', listKeys(variables('storageAccountid'),'2015-05-01-preview').key1)]"
            },
            {
              "name": "WEBSITE_CONTENTSHARE",
              "value": "[toLower(variables('functionAppName'))]"
            },
            {
              "name": "FUNCTIONS_EXTENSION_VERSION",
              "value": "~1"
            },
            {
              "name": "WEBSITE_NODE_DEFAULT_VERSION",
              "value": "6.5.0"
            },
            {
              "name": "ConfigurationStorageAccount",
              "value": "[variables('storageAccountName')]"
            },
            {
              "name": "ConfigurationStorageAccountKey",
              "value": "[listKeys(variables('storageAccountid'),'2015-05-01-preview').key2]"
            }
   ]
As I mentioned, one significant aspect of using resource templates is the consistent naming and grouping of resources. By using the template functions, we are able to get consistent yet flexible naming based on the resourceGroup's unique identifier, template parameters, and other defined resources.
Getting Outputs from an ARM Template
Creating all these resources is great, but our end goal is to get as close to the familiar F5 build and deploy experience in Visual Studio to start using the functions.
To do this we want outputs from the resource template. To get these outputs we define the following output variables. We'll get these as outputs from the ARM deployment and use PowerShell to create a configuration file for a developer to deploy the AFSP assets from inside Visual Studio to our new Azure resources.
  "outputs": {
   "FunctionAppName" : {
     "type" : "string",
     "value": "[variables('functionAppName')]"
   },
   "ConfigurationStorageAccount" : {
     "type" : "string",
     "value": "[variables('storageAccountName')]"
   },
   "ConfigurationStorageAccountKey":{
     "type" : "string",
     "value": "[concat('DefaultEndpointsProtocol=https;AccountName=', variables('storageAccountName'), ';AccountKey=', listKeys(variables('storageAccountid'),'2015-05-01-preview').key2)]"
   }
  }
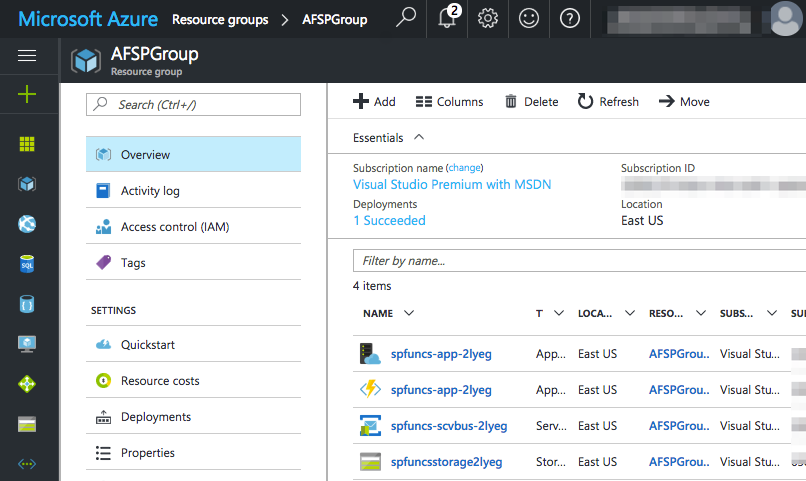
Creating Azure Resources
To create the resources in our Azure Resource Group, we need to log into Azure, select the subscription to deploy into, and then run a deployment script. For the AFSP deployment we'll use PowerShell for the deployment. In our case, we are using the deploy-arm.ps1 script.
The script first reads in the developer configruation from the arm.developer.json file. The GitHub source contains an arm.sample.json file to base your arm.developer.json file on.
{
    "azureaccount": "your_account@yourdomain.onmicrosoft.com",
    "subscriptionid":"your_subscription_id",
    "resourcegroupname": "AFSPGroup",
    "resourcegrouplocation":"East US",
    "deploymentname":"AzureSPFuncDeploy"
}
After getting the configuration from the json file, our deploy-arm.ps1 script logs into Azure using the Login-AzureRmAccount cmdlet.
To allow the use of an outlook.com or hotmail.com account, we must prompt the user for credentials with the following. using Login-AzureRmAccount only. If you are using a *.onmicrosoft.com or an Azure Active Directory account, the use of Login-AzureRmAccount with credentials will work, if not, leave the Azure account in the arm.developer.json configuration file blank. Note: If you provide an outlook.com or hotmail.com account, you may receive the following error:
Login-AzureRmAccount : Sequence contains no elements
Create an Azure Resource Group
Once we have logged into Azure, we call the select the subscription Id from the arm.developer.json file and make the following PowerShell cmdlet call:
New-AzureRmResourceGroup -Name $resourceGroupName -Location $resourceGroupLocation
Once we have a Resource Group created, we can call the cmdlet to deploy our resources using our arm-template.json defined resources and our parameters from the arm-parameters.json file:
#use the resource group, template file, and template parameters file to create the resources
New-AzureRmResourceGroupDeployment -Name $deploymentName -ResourceGroupName $resourceGroupName -TemplateFile "arm-template.json" -TemplateParameterFile "arm-parameters.json" | ConvertTo-Json | Out-File "arm.outputs.json"
If we pipe the output from New-AzureRmResourceGroupDeployment to Convert-JSON, the JSON formatted output file will give us access to all of our variables and outputs. This simple way of chaining a build process steps made sense for us, but in more complex deployments, refer to the Patterns for designing templates documentation.
For our purposes, we'll use the outputs section of the template to get our configuration outputs and use the arm-outputs.json file to now deploy the actual Azure Functions for SharePoint resources.
The Payoff
After we create the ARM template and run the script to create the resource group and all of our resources, we have a fully configured resource group, consistently named with the same resource prefixes, but with some variability in the suffix in order to all of the end points for the resources to be unique. Pretty sweet!
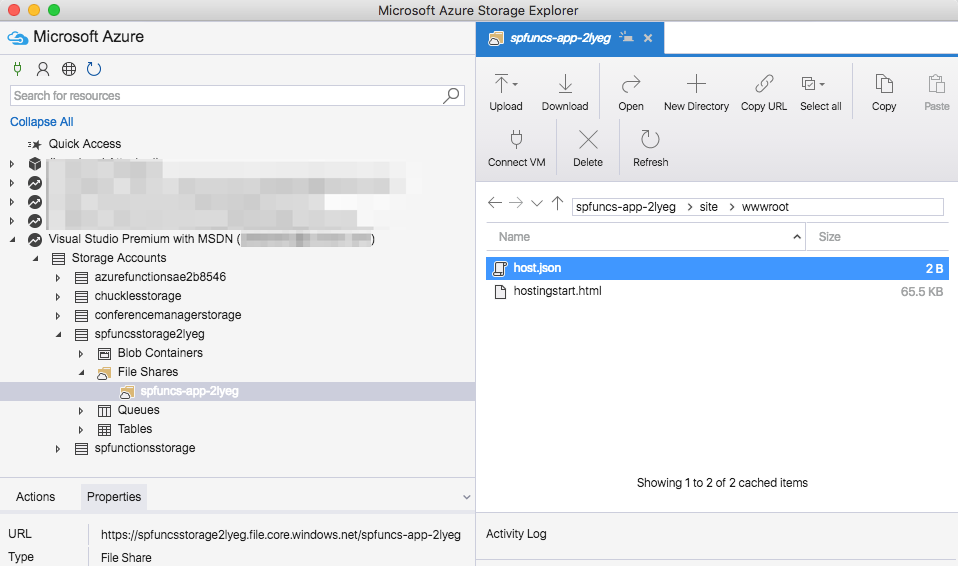
We are done deploying all of the resources in Azure needed for the Azure Functions for SharePoint solution. If you open Azure Storage Explorer, you can navigate to the storage account we just deployed and see we are ready to push our AFSP code into the /site/wwwroot/ folder.
What's Next
Let us know what you think. Give the ARM template deployment a shot and log any issues or feature requests on the Azure Functions for SharePoint Github Issues list. In an upcoming post, I'll walk through building the AFSP functions and using them from our Resource Group. I'll also be updating the Azure Functions for SharePoint documentation with this information and some updates for a complete install and simple test of the deployed functions.
You have all the resources (see what I did there?) to deploy the Azure Functions for SharePoint and give them a test spin.
HTH